Resources
Frames are a sets of highly customizable elements offering a multitude of approaches to creating frames of any width, height, and style. Frames can be created with simple keystrokes can be created with simple keystrokes or through direct selection from the Type Tester, a glyphs palette or a utility (more info). Use them for corner elements, borders, or to make an actual frame. Frames are available in the Adorn Collection, Adorn Smooth Collection, Boucherie, and Charcuterie.
Create your own custom borders using one of two easy methods! Video Demonstration
Setting the Stage
-
Create a new layer for your border. If you are designing in Illustrator, open the character panel and uncheck fractional widths from the dropdown menu.
-
Create a new text frame the size of the border that you want to create (InDesign, Illustrator) or click anywhere to start a text frame (Illustrator).
-
Click in the text frame and choose the Frames font from the font drop-down menu. Note: Frame fonts may appear as a set of borders rather than the font name in the font dropdown menu.
TIPS: You may adjust the height of the frame by decreasing leading, and the width of the frame by decreasing kerning.
Troubleshooting tip for InDesign and Illustrator users: If the borders aren’t lining up properly, uncheck “fractional widths” in the Character panel.
Method One: Using the Glyphs Panel
-
Open the glyphs panel and select the top left border corner. Double-click to insert the corner. Next, select the right top corner and insert it. Hit Enter on the keyboard. Repeat this step using the bottom left and right corners.
-
Highlight the border pieces and adjust the font size until it has the thickness you want, then adjust the leading to be the same size as the font. E.g., if your font is 48 pt, your leading should be 48 pt.
-
Place your cursor between the top left and right corner pieces and insert a horizontal piece from the glyph menu. Do the same between the left and right bottom corners. Now, place your cursor on the right side of the top right corner and hit the Enter key. Select a vertical piece from the glyph menu to insert, then add vertical pieces to the right side of the border, adding spaces as necessary. Continue adding vertical and horizontal pieces until the border is the width and height that you want. When you have your border the way you like, lock the layer and create a new layer for the rest of your design.
Method Two: Using the keyboard
Locate the border corners that you want to use. From the Character panel (InDesign), click on the dropdown menu, select OpenType, then select Default Figure Style. Or, simply open the OpenType panel.
-
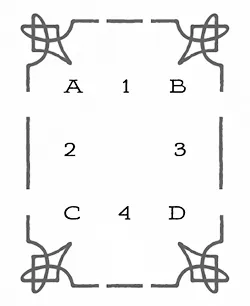
Type the letters/numbers/symbols for the top left and right border corners, hit Enter and type the letters/numbers/symbols for the bottom left and right corners. (E.g., AB [enter key] CD)
-
Highlight the border pieces and adjust the font size until it has the thickness you want, then adjust the leading to the same size as the font. E.g., if your font is 48 pt, your leading should be 48 pt. Note: in some programs, such as Microsoft Word, you won’t need to adjust leading. If there are any gaps in the vertical frame pieces, set your line spacing to single in the Formatting Palette and/or in Paragraph Spacing, Before and After are set to zero.
-
Place your cursor between the top left and right corner pieces and type the letters/numbers/symbols for the horizontal piece. Do the same between the left and right bottom corners. Now, place your cursor on the right side of the top right corner and hit the Enter key. Type the letter/number/symbol of the vertical piece that you want on the left side of the border, then do the same to the right side, adding spaces as necessary. Continue adding vertical and horizontal pieces until the border is the width and height that you want.